Outlook
ReSieve Help File
First, Your Email Client Sends the Request To ReSieve
Your email program
talks to ReSieve, which talks to your email server on your
behalf. Instead of your email program getting messages
directly, ReSieve grabs them first, scans them for
viruses(model 1400 and 1600) and then decide
in what TAG they should go into.
Once it's decided - which takes only a fraction of a second
- ReSieve does one of two things, it can add a tag like [SomeTag]
to the start of the subject line, which means that simple
filtering programs like Outlook and Eudora can deliver
your mail where it's supposed to, or, it can add a new email header like this:
X-Text-Classification: spam
from which, your email program will filters it to the right
folder.
POP3 configuration.
Two configs have to be done before
in your email client.
Step 1:
configure your email client/program's settings to make it talk
to ReSieve,
Step 2: set up your email filters/folders in your email
program so that things get put in the
proper folder.
Follow these instructions for some of the most popular email
programs. For others, or for advanced users - here are the
general instructions:
Step 1: change the POP3 server name in your email client to
ReSieve's IP address or host name, note the original address.
Step 2: change the POP3 user name to
POP3-server:Username
With the configurations above, email server will need to run on
the 110 port(POP3 default port).
See changing ReSieve port on
this
page if not running on port 110.
If for some reason the
email server is running on another port, clients
such as Outlook needs to be configured in the following way,
Add the port number to your email program
Change from, POP3-server:UserName
to, POP3-server:Port:UserName
, note the semi colomn before and after the port number.
If ssl is needed,
Change from, POP3-server:Port:UserName
to, POP3-server:Port:UserName:ssl
Click the link in the menu corresponding to your email program for a step by
step help.
| Note : If your RSF device is configured as a redundant device, use
the IP address inserted in the redundant module(window 2/Virtual IP).
Else, use the default IP on which you connected. |
Add groups configuration.
Supports roaming.
Click Config/Group or Ctrl+u

Create a Per group Configuration.
Step 1: Type the group name in the 'Group Email' box using the
suggested syntax. Be specific in choosing the name.
Like, group filters for
the accounting department. If you have multiple offices in different cities,
lets say, accouting@YourCity.
Step 2: Type in the
"Group ID" box, a 5 digit ID with which the user's
configurations will run on.
Step 3: Click the Add button.
Note: All the previous configured
groups will appear in the lower box.
This box will
provide you with all the group IDs already in use and help avoid
ID
conflicts. |
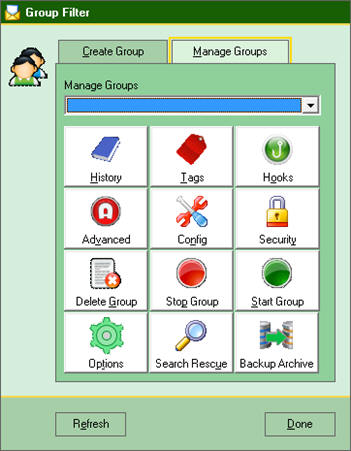
Managing Groups
Select the group you wish to manage from the drop down box.
If the drop down box is empty, click the "Refresh" button.
The 12 buttons shown in this window represents the same
configuration modules that are used in the main window menu.
Refer to the "config" link on the left side of this page for details.

Several step by step help are available to configure your email program. Follow the link corresponding to your email program.
Outlook 2010
Eudora
Pegasus


