GbJade Canada
ReSieve Help File
Connect to your dedicated ReSieve device.
Creating tags: click config/tags,

To create new tag, type in the name you want it to have and
click ADD. The new tag
name will appear in the REMOVE
tag, dropdown box and in the RENAME tag section too.
From there you can remove or rename it, what ever the case. If
you already have emails in a tag
you should rename it.
History Interface: click config/history or Ctrl+h

By default ReSieve keeps 2 days worth of emails in its
database.
Only the first 20 emails are displayed on this screen. Chang
this config by Pressing ctrl+o
To remove only one entry, double click on the desired one
and click "Remove" button.
Reclassifying an email to another tag,
Single click to
select an email, the the staus colomn will show "Reclass",
from there you can reclassifying it. In "Reclassify Selected
Object" dropdown box, select the desired tag and click the
"Reclassify" button.
Repeat for every email not having the right TAG.
You should get the same results as shown in the table
below, if done correctly.
|
Messages
|
Reclassified
|
No.
|
No.
|
Accuracy
|
|
Messages
|
Reclassed
|
|
1 to 1,000
|
24
|
1,000
|
24
|
97.6%
|
|
1,001 to 2,000
|
9
|
2,000
|
33
|
98.3%
|
|
2,001 to 4,000
|
7
|
4,000
|
40
|
99%
|
Undoing a reclassification.
Once an
email have been reclassifyed, the "Undo" button will be
available if you select the same email again.
| Note : Pressing the "Remove
All " button will remove every email stored in the
database rendering these no more available in the
History window. The original emails will be available
in the "Archive directory" only the next day. From
there you can use the "Search and Rescue" tool to
access them or use "Backup Archive" tool to download
them to your computer, making them available from your
disk or whatever path you sent them. To get "Backup
Archive" window, click menu Addon/Backup Archive. |
To see the other emails you need to delete the ones you
have on your screen. To do so click "Select all" button
folowed by clicking the "Remove" button. This will make place
to display the next 20 emails that ReSieve has filtered.
OR
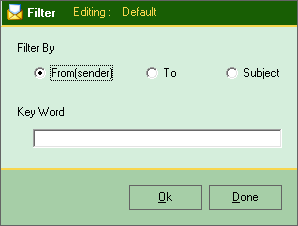
click the "Filter" button at the right hand side of the
window, the following window will apprear.

The upper image/tool works only from within the
storage/database. To widen your search, use the "Search and
Rescue" tool. Click the menu Config/Search and Rescue.
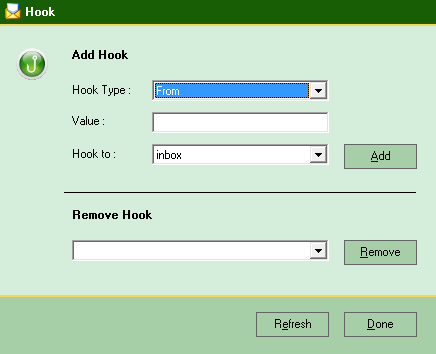
Hooks: click config/Hooks

Use the HOOKS to make sure that a known email address gets a
specific tag.
No matter what is written, the email will be
tagged as you specify.
Select 1 of the Hook Type that you wish, type
in the email address and select the tag
to which you want
it to be in to.
Here are some hints you can use.
|
Match Type |
Results |
|
john@YourDomain.com
|
Matches same address only. john@YourDomain.com
|
|
YourDomain.com
|
Matches all addresses coming to YourDomain.com
including sub-domains.
john@YourDomain.com john@Sub.YourDomain.com , etc.
|
|
@YourDomain.com
|
Matches all addresses coming in at YourDomain.com
but excludes all sub-domains.
Matches john@YourDomain.com but does not match
john@Sub.YourDomain.com
|
|
.YourDomain.com
|
Matches all addresses of sub-domains of
YourDomain.com
Does not match john@YourDomain.com
but matches john@Sub.YourDomain.com
|
Config: click menu config/config or
Ctrl+o

Number of messages per page: Specifies
how many emails will be displayed in the history window at
once.
Number of days of history: All emails received within
the last number of days specified will be kept on ReSieve for
further references. This will give you X number of days to
reclassify (if necessary) received email to the wanted tag
and/or fetch original email.
Note : You must take into
account the storage capacity of your device. Puting
the "Number of days of history" to keep too high might
make you reach the maximum storage capacity.
Capacity is counted in combination of what is in the
storage directory and the archiving directory.
When
maximum archiving capacity is reached, files in the
storage directory will not be moves to the archiving
directory, they will be deleted. In this case, files
connot be recovered for viewing nor backup. Use the
"Backup Email" window to download all file in the
arciving diectory to your computer or backup device.
Make sure you have disk space to store them. |
Storage directory. Used to
reclassify emails if needed within the delay selected in
"Number of days of history" option.
Archiving
directory. After the "Number of days of history" is
reached, the email is moved to the archiving directory and
clears the database, keeping RSF at its fastest filtering
speed. These files can be fetched and viewed but cannot be
reclassified.
|
Model number |
1100 |
1200 |
1300 |
1400 |
1600 |
|
Storage/Archiving |
10Gbs |
10Gbs/40Gbs |
10Gbs/220Gbs |
10Gbs/940Gbs |
10Gbs/4Tbs |
POP3 listening port: ReSieve will
listen for incoming request on the specified port. Unless an
email server is running on the same device, the port should be
left to 110. If this is changed, you will need to change the
port in all the email clients (Outlook express or other) that
you have.
Port, Host and User Separator:
Character that is to be used to separate the email server
address and the user login name.
Keep the default.
Security: click config/security

Enter the server name and port of your Secure Password
Authentication-protected server. Once done, you simply need to
change the server name in your mail program to the ReSieve IP
address, you don't need to change the username.
Advanced: click config/advanced

All words added to this form will be ignored. Despite the fact
that a word may be added and counted when reclassifying an
email.
|


